TABLE OF CONTENTS
- Chapter 1 – Introduction to K2 Server (and Client)
Chapter 1 – Introduction to K2 Server (and Client)
Overview
K2 Server is a workflow architecture for prepress and pressroom production. Preflight, Ink Mapping, Color Management, Proofing, RIP, Trapping, Imposition, Job routing, and other modules are all part of the K2 framework.
K2 provides multiple features for simplifying and empowering prepress workflows.
K2 Client provides a single, simple user interface from which users – from their own desktops – can monitor jobs through various production stages. Users can view, modify, delete, re-process and generally manage their work without leaving their desks and without learning the complex user interface of a RIP.
By using K2 Server, operators can track thousands of jobs from their Windows or Macintosh clients.
K2 Server
K2 Server runs on a PC. It requires Windows 11 Pro. No “Home Edition” versions of Microsoft’s operating systems are supported. By default, K2 Server runs on the same computer as the RIP. However, you may configure more complex multi-computer systems.
K2 Server handles system security (licensing) and requires a dongle to run.
Clients will run without dongles and the Server will accept as many Clients as are currently permitted by the system. Upgrading to support additional Clients is a simple process of entering a security code into the Server to update the permissions. This Server upgrade menu is called “Product Features.” Contact your dealer to purchase additional permission codes.
Operation with a K2 Server dongle
The K2 Server handles system security. Therefore, K2 Client platforms do not need dongles. The Server will accept as many Client connections as are currently licensed.
Upgrades to the system can be handled with license codes.
K2 Clients
K2 Clients are available for PCs running Windows and Mac.
The Client provides the regular user interface to the system, after completion of basic system configuration. Users may connect to the K2 Server and, subject to their access privileges, create or modify workflows and manage jobs.
The system saves the user’s work and job status so the user can connect via another Client on another computer and see their work as they would expect.
Clients allow users to:
- Create, modify or delete workflows.
- See jobs in the system using a number of different views.
- Review jobs that are held at various workflow stages.
- Release, delete or re-submit jobs.
- Soft proof jobs on screen before final output.
- Check traps, separations, spot colors etc.
- Create PDF Files
- Preflight PDF Files and review PDF Preflight Reports
- Participate in a certified PDF workflow
- Remap ink color separations
- Impose pages
The Client has it's own documentation here.
After launching the K2 Server application, the Server Dialog appears on the Server PC:
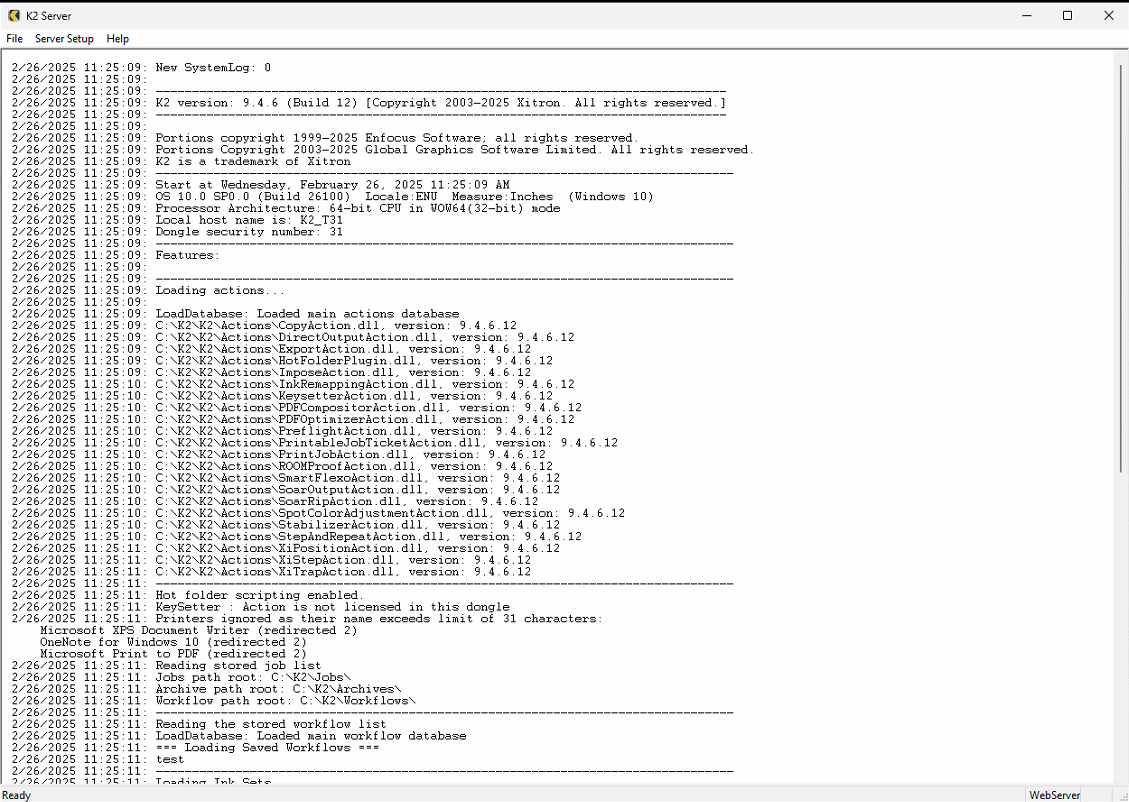
This window displays information about the Server including its serial number, name and other variables.
K2 Server looks like this in the Windows Task Bar:

To exit the Server, use the File > Exit menu selection or the Exit button at the top right corner of the window.

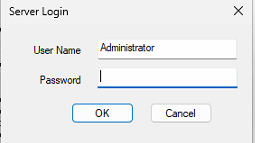
A special user account called Administrator has full rights to configure the K2 Server. Upon installation, the Administrator password is blank. The only active menu item is Server Setup > Administrator Login. Choose this option, and click OK, leaving the password field blank.
You now have access to the full range of Server features. Xitron recommends setting a password for the Administrator user during initial set-up. Go to Server Setup>Users dialog (see below) to set the password. Any further changes to the configuration will require logging in as Administrator and entering the correct password.
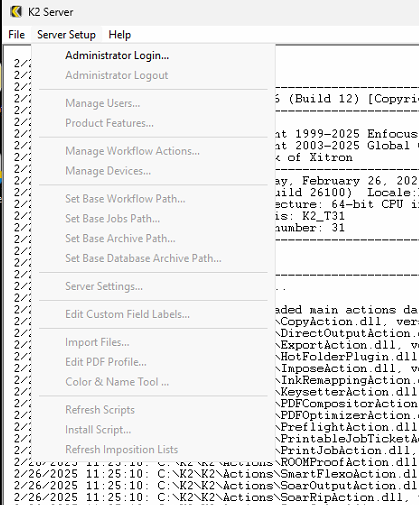
The K2 Server must be configured when it is installed and when changes to the system are required. The most common change after installation is the addition of new Users.
Configuration options are:
- Add, delete, or change Users
- Upgrade product
- Manage Actions (processes managed by the Server)
- Set locations on the system for storing workflows and jobs
- Set Server Name (for cases where there are more than one K2 Server on the network)
- Set custom field names (for organizing and sorting jobs)
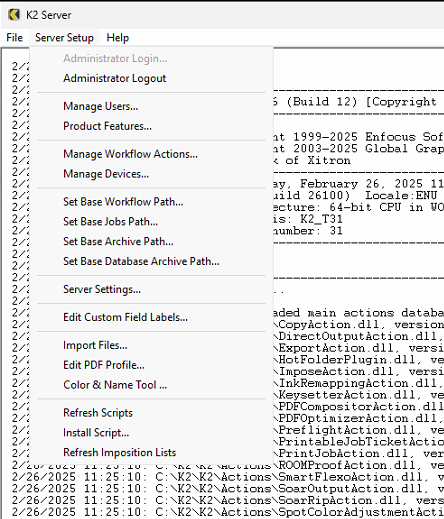
Access these options via the Server Setup menu item, as discussed below.
User Management
All system users must register with the Server. Depending on the options purchased, the system limits the number of Users who can simultaneously connect. However there is no limit to the number of users who can be defined at the Server. For example, you might have a 5-User system, but 12 employees who work different shifts. You can define 12 different Users at the Server, and any 5 of them can be connected at one time. If you wish to upgrade your system to support more simultaneous Users, this can be done via a password through the Upgrade Product dialog.
To manage Users select the Server Setup > Users menu item.
To create a new User
Click Add, and enter the User name and Password as shown in the next figure labeled Create a User.
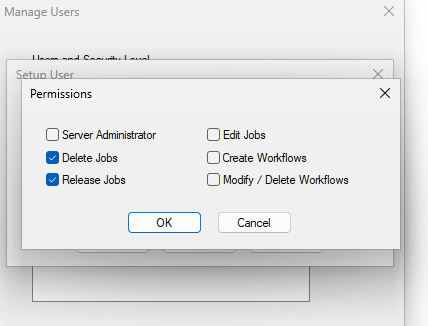
Note that a password is not strictly necessary. If this field is left blank, this User may connect to the system without a password. Specify the User type by clicking one of the Radio Buttons. Choose Administrator or Standard User, or by clicking on the permissions button, create a Special User.
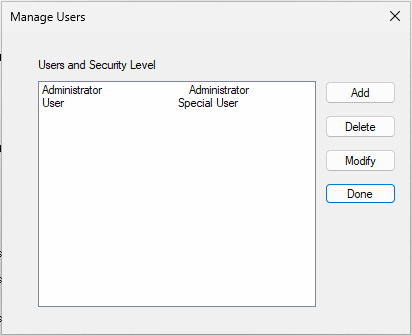
Depending on the type of User created, certain restrictions will apply. For instance, Administrators have all Permissions allowed while Standard Users can only Delete or Release jobs. Special Users are created if you select any other combination of Permissions. After establishing Permissions, click OK until the system returns to the User dialog shown earlier. Confirm the new User(s) is/are shown correctly.
The Permissions available are shown here:
To Delete A User
Access the Users dialog (Server Setup > Users menu), highlight the User to delete, and click Delete.
To Modify a User Account
Access the Users dialog (Server Setup > Users menu), highlight the User to change, and click Modify. Make the changes as outlined above for a New User.
When all changes or additions are complete, click Done to close the Users dialog.
Upgrade Product
K2 Server uses a security system based on the combination of a single system-wide dongle and a series of codes to enable or add specific functions.
Connect any new dongle and add codes by navigating to the menu item (Server Setup > Upgrade Features). The following dialog appears:

The upper portion of the window displays the dongle Serial Number, the maximum number of simultaneous Client connections, whether or not this system is a Trial (Demo system with an associated expiration date), the maximum number of RIPs that can be managed, and the Product Version number.
In the lower center of the screen is a list of Actions that are available in the software. To the right of each Action is the word “Yes” if the Action is currently active or “No” if it is not. To enable currently disabled Actions, add a new RIP or Client connections, you must first obtain the appropriate code from your supplier.
To install the upgrade, enter the code into the boxes at the base of the dialog and click OK. Upon verification by the system the option will be added or changed.
Note: You will also need an upgrade code if you have upgraded from one product Version to another. For example upgrading from Version 8.x to Version 9.x will require a Version Upgrade code.
Manage Actions
“Actions” describe the individual steps or processes K2 Server uses in the construction of workflows. For example, the RIP Action is a basic action that controls the RIP portion of a K2 Server system. Other actions are optional, and the choices shown in the dialogs will depend on the version of K2 Server as well as the options purchased.
To configure Actions, select the menu item (Server Setup > Actions). The Actions Manager dialog will appear as shown below:
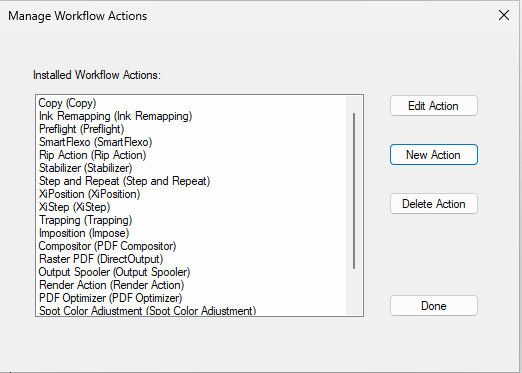
The install creates several actions. You may wish to create more. Only configured Actions will be available for Users creating workflows in the Client.
The basic necessary Workflow Actions
The essential actions such as RIP, RIP Output, Direct Output, and Copy are covered here. The others have their own chapters, available here.
The RIP Action.
The RIP Action is how we control the Harlequin RIP. From K2 Server’s Actions Manager click New, select RIP from the list of Workflow actions, and name the Action. This is the name that users will see from their Client workstations so choose a name that will be helpful to your users; especially if you have more than one RIP.
Note: If you are connecting a RIP that resides on the same PC as the K2 Server, simply check the RIP is local… check box and the configuration will complete automatically.
If you are configuring a RIP Action for a RIP that is not on the same PC as the K2 server, use the Browse button to locate the shared xipgb folder on the RIP. K2 Server will attempt to communicate with the RIP immediately.
The timeout value is the length of time K2 Server will wait for a job to be processed by the RIP before reporting an error. Click OK twice to close the Workflow Actions Manager and return to the Server window.
You may repeat this process with as many RIPs as your K2 Server is licensed to support. Multiple RIP support can take the form of several unrelated RIPs driving several unrelated devices or load balancing across RIPs driving similar devices.
The RIP Output Action
The RIP Action is how If a RIP Action is configured in the Server (Server Setup > Manage Workflow Actions), both RIP Action and RIP Output Action will be enabled. The RIP Output Action will be named by appending ‘Output’ to the name of the RIP Action.
The purpose of the RIP Output Action is to take input from a RIP Action which is configured to produce output suitable for a particular device, and to send that output to the device. So for the workflow configuration in the Client, a RIP Output Action must be preceded by a RIP Action which is associated with a Page Setup for an output device.
Direct Output Action
Direct Output is an alternative RIP Action that supports Harlequin RIPs version 8 and later. Direct Output can be used in the same workflow as the RIP Action or separately. It does not allow for a pause between RIP and output. Commonly it is used for NORM proofing workflows. There are other uses as well. Direct Output supports any output device supported by the RIP. Simply drag it into a workflow and choose a page setup to configure. The simplest workflow possible would be a hotfolder and the Direct Output action alone.
The Copy Action
Use the Copy Action to create a copy of a job file and send it immediately to another workflow. This enables one job file to be used, for example, to create both low resolution and high resolution PDF files for different purposes. (To copy a file outside of K2 Server, such as a Hot Folder providing input to an Imposition product, use the Export Action). To create a Copy Action, select the menu item Server Setup > Manage Actions. Click New Action, select Copy from the Workflow Agent list box, enter a suitable name and click OK. (No additional configuration is necessary when creating a Copy Action.)
It is a good idea to name the copy action for the purpose it will be used. For example, to copy files to a workflow that processes proofs, a good name for the copy action would be “Proof.”
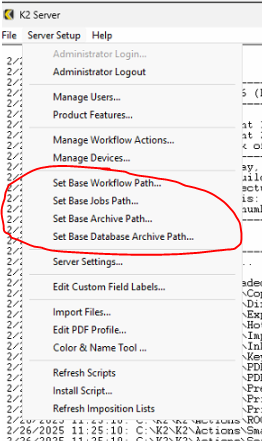
Set System Paths
The Server Administrator can control the storage location of Workflows, Job Files, and Archives. By default, these are sub-folders in a folder named “K2,” located on the “C” drive of the K2 Server PC. However, the Administrator may change this to any accessible location. For better performance, Xitron recommends the Jobs and Workflows folders remain on the K2 Server PC. The Archive folder may be placed on a remote or removable drive.
In addition the databases are archived, by default into a folder named “Archived DBs” within the folder containing K2 Server. These archives are written every 24 hours, and are intended for manual recovery in the case of loss of the K2 Server PC’s hard drive, so you may wish to set their location to a remote networked drive. If so, please ensure that the drive can be written with a sufficiently high transfer rate.
Note: When a User creates a Workflow, the system creates a Hot Folder with the Workflow Name inside the System’s Jobs folder. Make sure that there is sufficient space in the designated location to store all the jobs expected to reside on the system at one time. Keeping several days’ or weeks’ worth of jobs on the system is possible only if sufficient drive space exists.
To set System Paths, select the menu items Server Setup > Set Base Workflow Path, Set Base Jobs Path, Set Base Archive Path or Set Base Database Archive Path.
Server Settings
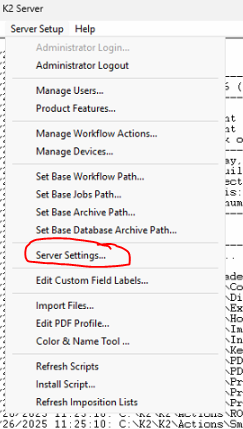
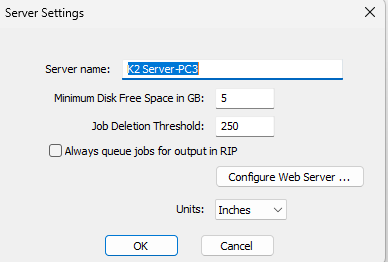
To change the network name of a Server (i.e. the name that Client sees), select the menu item Server Setup > Server Settings.
The system protects itself by halting job processing if the free disk space falls below a threshold level. By default this is 5 gigabytes. For troubleshooting purposes, you may need to change this. In normal operation the default value is correct.
The client application can set a job to delete “when necessary.” The “when necessary” threshold is defined in terms of the number of jobs in the system and may be modified here.
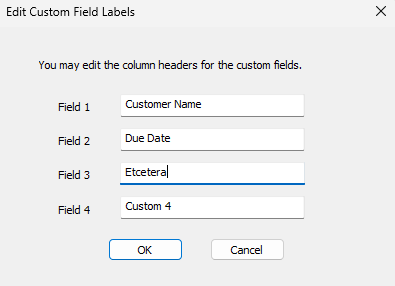
Custom Field Labels
K2 Workflow includes a range of features for organizing lists of jobs and related information for users. Some of the most powerful are the Custom Fields. These are four fields that can contain any information the user wishes. This information is then available for display and sorting purposes by each user from within their Clients.
Defined at the Server, Custom Fields can be given appropriate names that apply system-wide. Users can then add information to each field on a per-job basis from any Client.
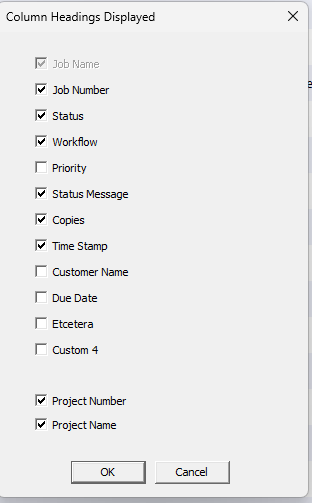
To define Custom Field names, select the menu item Server Setup> Edit Custom Field Labels menu. Enter the Names you wish to use in the four boxes and click OK. Name the fields any way you wish. Keep in mind that when a User chooses to display these fields, they will be displayed in order from left to right on the User’s screen,
with Field # 1 appearing first.
In this example we added three custom fields in the Server:
So in the Client (Mac or Windows) , you would go to the Column Headings menu, here:
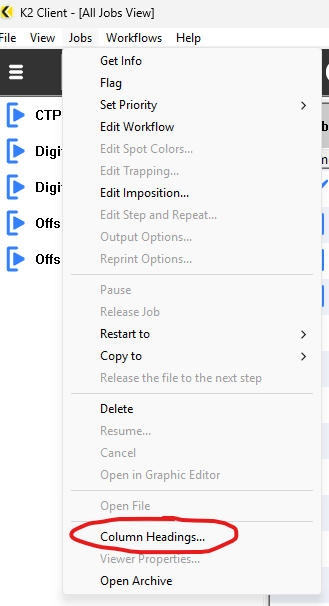
And then turn on your new ones and configure them however you want them
Preflight Profiles
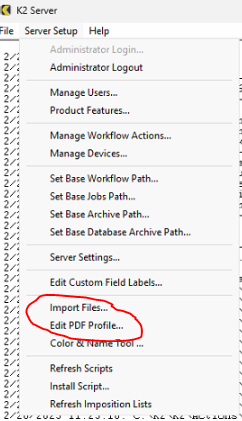
Import Files... will allow you to import Enfocus Action Lists and Preflight Profiles from Enfocus Pitstop to use with the Preflight Action.
Edit PDF Profile will allow you to create Preflight Profiles without having a copy of Pitstop.
The rest
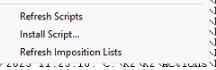
Install Scripts let you install scripts for the Scriptable Hotfolder option.
Refreshing them forces the Server to look for new ones so you don't have to reboot while testing some scripts.
Refresh Imposition Lists looks for new impositions (but is not ordinarily necessary).
Return to the main page for more documentation.