Impose User Guide


TABLE OF CONTENTS
- Imposition Action
- Workflow Configuration
- Imposition Editor – Imposition Presets
- Binding Section
- Output Options
- Output Back Sides First:
- Output Last to First:
- Rotate Output:
- Use Marks When selected, this option displays a list of available Marks Profiles from Impostrip. Refer to the Impostrip documentation for details on marks profiles and how to create them.
- Edit/Create Marks (button)When marks profiles are used, a pencil button will be available for the user to edit the selected mark profile in the list. When the user pushes this button, a remote Impostrip application will open the marks profile selected in edit mode automatically from the client workstation. The user can then edit the marks profile, save it and close the editor.
- Output PDF
- Job - Output an imposed PDF as a single PDF.
- Custom naming for imposed PDF output
- The user can control file name suffix settings for signature, side, or web is selected for PDF output.
- PDF Source and Page Adjustments
- Imposition Preset Section
Imposition Action
The Imposition Action uses imposition presets to cater to various requirements. These presets can be configured and adjusted as needed. The user can open the imposition editor and adjust the preset settings to accommodate a specific job.
Example:
Suppose an imposition preset is set up for a saddle-stitched booklet, with the press sheet size defined as 26x20. However, the paper mill only has 28x20 sheets available. In this case, the user can:
- Open the workflow client and select the job.
- Click the Edit Imposition button.
- Change the press sheet size to 28x20.
Once the user clicks OK, the workflow reimposes the PDF using the same preset, but now on a 28x20 press sheet. This flexibility allows each job to have a unique imposition that can be edited at any time.
Workflow Configuration
- The Imposition Action works exclusively with PDF files.
- Ensure the incoming PDF contains all necessary pages in the correct reading order.
- Use a Preflight Action before imposition to automate preflight checks and ensure the PDF is print-ready.
A workflow with the imposition Action in it looks like this:
Imposition Editor – Imposition Presets
- To create a new imposition preset, click the plus button in the Imposition Action tab.
- Enter a name for the preset, e.g., BindingType_ImpositionTemplate (e.g., SS_8pg_Offset).

- The Imposition Editor will open for further configuration.

Binding Section

Binding Type
Selecting the binding type desired for your preset.
Options are:
- Perfect Bound
- Saddle Stitched
- Cut and Stack
- Coming and Going
Sides
Select the number of sides for the imposition.
- Simplex for single side
- Duplex for two sides
Bind On
Choose Left or Right bind side (only applicable for certain binding types).
When Saddle Stitched is selected, the Use Page Creep button becomes active, allowing the configuration of page creep.
Use Page Creep
This button becomes active only when Saddle Stitched is selected as the binding type. Page creep refers to the incremental shifting of pages toward or away from the spine during the binding process. This adjustment is necessary for saddle stitching to compensate for the paper thickness and ensure that the final output remains properly aligned and visually consistent.
Here are the options for page creep:
Total Creep In
Total Creep In value is the amount of movement towards the spine applied to the center two pages and their backs — the pages that require the most amount of compensation. From the center quartet of pages back towards the outside four pages of the job, the imposition engine applies an ever-decreasing amount of movement. Every quartet of pages is moved by an amount less than the previous quartet. The outside two pages and their backs are not moved (zero compensation).
Initial Creep Out
This value is the amount of creep from the spine. While Total Creep In compensation is usually sufficient, you may find that the page images get too close to the spine. This problem can be resolved by the InitialCreepOut feature. This will move all the pages of the job further out towards the outside margin (away from the spine). This movement takes place before the TotalCreepIn compensation value is applied. Normally, the movement applied by the Creep Compensation feature is horizontal—towards the inside or outside of the pages. InitialCreepOut is not a must.
Creep by Scaling
Creep by Scaling is a technique that compensates for creep by reducing the size of the pages, depending on the sheet, instead of using the traditional method of offset movement. For example, in a 20-page saddle stitch book with 1/16th of an inch creep for every quartet of pages, the center spread will have a smaller individual page size compared to the outermost pages. This helps maintain proper alignment, especially for text, graphics, or images that cross the gutter.
Output Options

Options are:
- Output Back Sides First
- Output Last to First
- Rotate Output
- Use Marks
- Edit Marks button
- PDF Output: Job, Side, Signature, or Web
Output Back Sides First:
When checked, the imposed PDF will have all the back sides in order first, followed by all the front sides in order.
Output Last to First:
Check this option to output the PDF in reverse order.
Rotate Output:
Rotates the imposed PDF by 0, 90, 180, or 270 degrees.
Use Marks
When selected, this option displays a list of available Marks Profiles from Impostrip. Refer to the Impostrip documentation for details on marks profiles and how to create them.
Edit/Create Marks (button)
When marks profiles are used, a pencil button will be available for the user to edit the selected mark profile in the list. When the user pushes this button, a remote Impostrip application will open the marks profile selected in edit mode automatically from the client workstation. The user can then edit the marks profile, save it and close the editor.
Users can create new marks profiles by navigating to the marks profile list in the remote editor. There they can create new or duplicate marks profiles. Once the new marks profile is saved and the remote editor is closed, the new mark profile will be available for selection in the marks profile list. Users can delete a marks profile in the remote editor.
Output PDF
Job - Output an imposed PDF as a single PDF.
- Signature – Output multiple PDFs. One for each signature.
- Side – Output multiple PDFs. One for each side.
- Web – Output multiple PDFs. One for each web group.
Note: The Preflight, Ink Remapping, and XiPosition must be used prior to imposition if PDF output is set to Signature, Side, or Web. If you set it to Job, you can use those actions either before or after imposition.
Custom naming for imposed PDF output
The user can control file name suffix settings for signature, side, or web is selected for PDF output.
Go to the Xitron server PC and open Ultimate Impostrip. It may be running already, check the task manager. Right click on the Impostrip icon and select Show Application.

Click the gear icon and click Preferences, then Output.

Customize the names and then save. PDFs output as either signature, side or web will now use these settings for the suffix name of the PDF.


If the PDF name is required for RIP output, then the RIP page feature “Use filename as jobname” must be used. Custom imposition naming is useful for Proof, CIP and Plate output because it identifies the signatures and sides automatically in the name of the PDFs. In the RIP tab:


PDF Source
PDF Page Adjustments:
In this area modifications can be made to the source PDF pages used for the imposition. Settings can be applied to a new imposition preset or settings can be applied to each job independently on the fly. Click the pencil button in the PDF Source area to access these settings. When page adjustments are done, click OK. To cancel page adjustments, click the X in the top right corner to close the window.
Page Offsets:
Page offsets allow the user to shift the position of PDF pages along the width and height. Positive values will shift the page to the right or up, while negative values will shift it to the left or down. Offsets can be applied globally to all pages or individually to odd and even pages.

Page Bleeds: Page bleeds are used to extend the page content beyond the trim line, ensuring that there are no white borders in the final output due to minor misalignments during trimming. By default, the Automatic checkbox is selected, which honors any bleed settings in the source PDF. When Automatic is unchecked the bleed settings will then appear. The To Fold check box will be checked on all sides. Uncheck To fold on a side to enable the bleed value filed. Once unchecked the user can then enter the bleed override value. Check All Pages to apply bleed values to both odd and even pages.
Page Scale: Page scale allows users to resize PDF pages by adjusting width and height values, either increasing or decreasing the page size. This can be useful for adjusting content to fit specific imposition layouts or to ensure proper margins. A preview of the scaled page is provided, showing how the adjustments will look before finalizing.
Gang Page Workflow
The gang pages checkbox can be used when a job requires independent pages that may need to be a different size placed on the same press sheet. For example, you may want to impose some business cards and post cards on the same press sheet. This can be accomplished by following these steps.
Gang Page Imposition Template
Open the imposition edit and click the plus button to create a new imposition template.
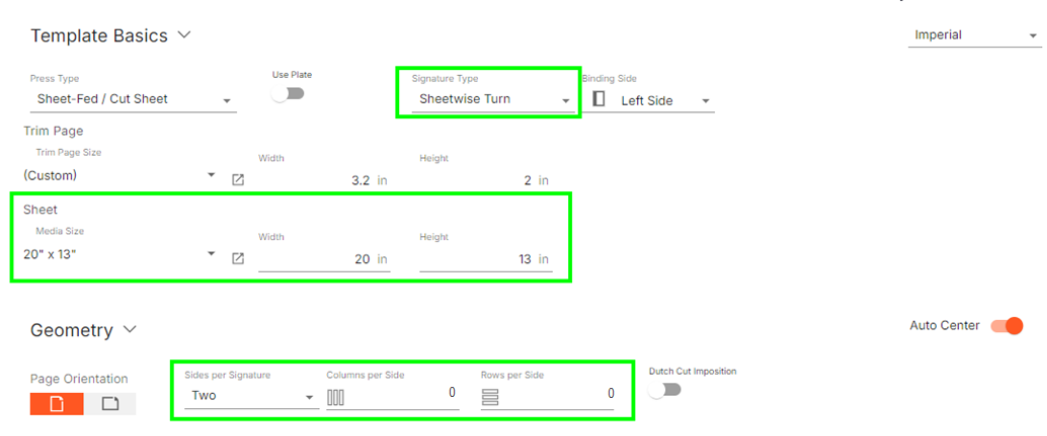
Create a new template and define the work style, Media/Sheet size, number of sides, and sets the row and column values to 0. The value is set to 0 so that we can start with a blank press sheet and add gang pages.
Note that fold pages cannot be combined with gang pages when using the imposition action. All pages on the sheet must be gang pages.
Now add gang pages to the press sheet by clicking the Add Ganged Page button in the toolbar. Each gang page can have an independent size and can be positioned anywhere on the press sheet. Use the tools in the toolbar to position and size the gang pages. Page numbers are assigned to each of the gang pages so that the pages in the source PDF flow into the correct page position on the sheet. See the section “Ganged Pages” in the Ultimate Impostrip user guide for more details about the tools.

In this example I added 11 gang pages, 3 different business cards and 2 different post cards placed as gang pages on the 20” x 13” press sheet. Give the template a name save and close the imposition editor.

Using a Ganged Page Imposition Template
All pages that need to be assigned to ganged pages will need to be in a single PDF file. If you are using the Xitron K2 workflow, the job submission application can be used to create a single PDF from multiple pdfs that are various sizes.
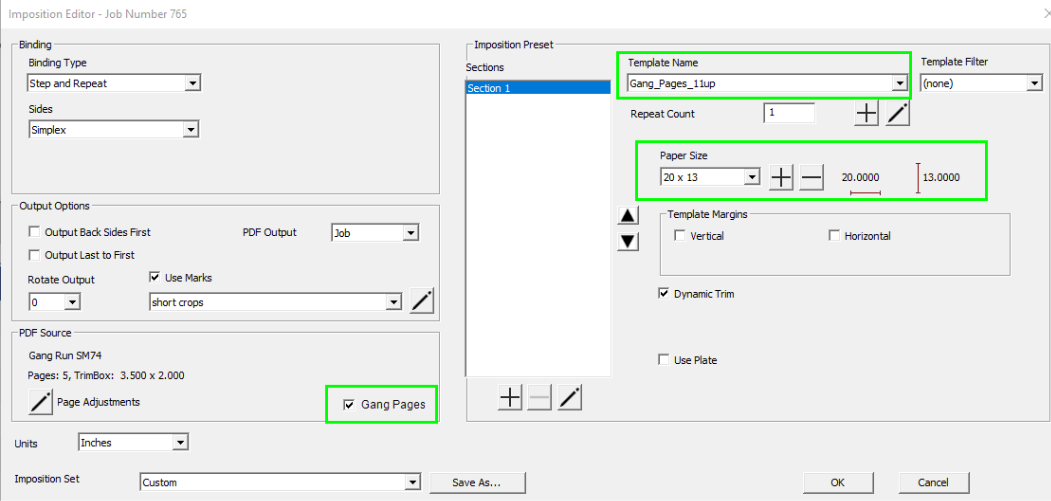
It is important to indicate that all the pages in the source PDF are defined as “gang” pages. To do this the user simply clicks the check box “Gang Pages”. This tells the imposition engine that all pages in the PDF belong to gang pages in the template. The pages then flow into their assigned page slot.
Note: If the Gang Pages check box is not checked and the template selected has gang pages defined, the imposition engine will return this message.
Error 192: PDF file was created with no output flats
Edit the imposition and check the gang pages box, click ok to reprocess the imposition.
The gang template loads automatically in the template name field if create in the same editor session by clicking the plus button. If the template was created beforehand, select the gang template to be used in the list.
Unlike fold pages, when using gang pages in a template the page position, press sheet size and margins are controlled by the template. Because of this it’s important to select the same press sheet size used in the gang template.
Once satisfied click OK to release the job to the imposition engine to produce a ganged imposition.
Imposition Preset Section

Sections
The imposition section is where the template, paper size, margins, and trim rules are applied to the imposition. By default, the section will be named “Section 1” The section can be renamed by clicking the pencil icon under the section column. A field will display so the user can change the name.
Additional imposition sections can be added to an imposition preset if a job requires mixed impositions. For example, you may create a preset that has a section that’s a 4-page work and turn imposition and another that is an 8-page sheetwise imposition.
Multi Sections
To add a new section, click the plus button under the section column. A new section appears with the name Section#.
Click the pencil to give the section a specific name.
- If the user highlights an existing section and clicks the plus button, all the imposition preset settings will be copied to the new section. From there the user just makes the changes needed to the settings for that section.
Template Name
This dropdown allows the user to select an imposition template from the Impostrip library. The templates can be filtered by selecting a specific signature type defined in the template. The user can type the first character of the template name to jump to templates starting with the character entered.
New Template Button
Click this button to launch the Ultimate Impostrip remote editor to the template list window. In the remote editor, users can create and duplicate new imposition templates. Once the remote editor is closed, the newly created imposition template will automatically be selected in the template name dropdown list of the preset.
Edit Template Button
Click this button to open the template selected in edit mode. Edits can be made to the imposition template in the remote editor and saved.
Repeat
The repeat count tells the imposition module how many signatures are needed for an imposition. The only time this field needs to be defined is when there is more than one imposition section. If the preset only has one section the repeat count can be left with a value of 1 and the imposition engine will automatically create the number of signatures needed based on the PDF source page count.
See section Mixed Templates Impositions for more information regarding the repeat count and when to use it.
Paper Size
Paper size defines the paper size that you want to place your imposition template on. Click the plus button to enter a new paper size to the library. Click the minus button to remove a paper size.
Override Template Margins
By default, the imposition template will be placed in the center of the paper size chosen. If margins need to be overridden, the user can check the Override Template Margins box and define margins for top, bottom, left and right. The margin value defines the distance between the template edge and edge of plate.
For example, if a template needs to be set back ½” from the bottom of the press sheet and centered left and right. Check the Override Template Margin box and entering a value of 0.5” for the bottom margin only the template will be positioned ½” back and centered left to right on the press paper.
Trim
Dynamic Trim will be checked on by default when creating a new imposition preset. When Dynamic Trim is active, the imposition engine will use the PDF trim box defined in the source PDF.
If the user unchecks Dynamic Trim, then a custom trim width and height can be entered. When a size is entered the PDF will be anchored to the center of the page and cropped around the pages.
Use Plate
Use Plate allows the user to define printing press plate sizes with positioning rules for the paper position on the printing plate.

To create a new plate:
- Click the plus button to bring up the New Plate Size dialog box.
- Enter the plate width and height dimensions.
- To position the press paper on the plate:
- Use the Center check boxes to center the plate on X or Y or both.
- Enter a value to X or Y for paper edge to plate edge offset.
The dimensions and offsets will display to the right of the plate for information. If you need to remove a plate, click the minus button.
Once all settings are applied to the imposition preset click the save button. The imposition preset will now be available in the preset dropdown selector in the imposition action.

Using the Imposition Action in Production
Automated Imposition Workflows
Automated workflows are a powerful feature for handling recurring tasks efficiently. By setting up workflows with predefined imposition presets, you can streamline your production process for frequently repeated job types, such as business cards, booklets, or posters.
- Creating a Workflow: To create a workflow, navigate to the Workflow Editor and click on the New Workflow button. Enter a name for your workflow, such as "Business Card Workflow."
- Adding Imposition Presets: In the workflow, add an Imposition Action and select a predefined imposition preset, such as a business card layout on a 12x18 sheet. This ensures that any PDF dropped into the associated hot folder will be automatically imposed based on the preset settings.
- Using the preset workflow: Hotfolders are created for each workflow to enable automatic detection and processing of incoming files. When a file is added to the hot folder, the workflow will trigger, and the imposition process will be performed without manual intervention.
Configuring and using a custom Imposition Preset
Another option is to create a custom imposition workflow where a basic “Custom” imposition preset is selected. By doing this the user will be able to pause after the imposition step, edit the custom imposition using the imposition editor and saving the changes so that the custom settings are used for imposition.
Custom Preset Configuration
- Create or open a workflow in the workflow editor
- Click the plus button and name the preset “Custom”
- Use the following Settings for your custom imposition preset.
- Binding Type – Step and Repeat
- Sides – Duplex (Note: If the incoming PDF has 1 page the imposition engine ignores duplex setting.)
- Bind On – Left or Right
- Template Name – 1x1 (This is just a 1up template)
- Paper Size – Enter a large sheet size. This size should be able to accommodate the maximum 1up size.
- Click OK to save the custom preset.
- Apply this “Custom” preset to a workflow with a pause after the imposition action. The pause will be the point where the user can click the edit imposition button to apply custom imposition settings for a job.
Custom Saddle Stitched Example (using the custom preset)
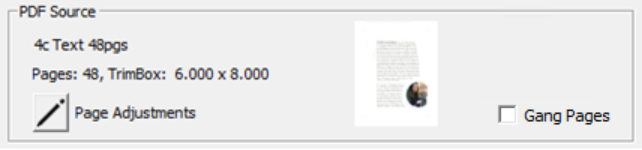
- A 48 page PDF is sent to the workflow
- User highlights the job, and clicks edit imposition button to launch the imposition editor with the custom settings. Note that the job number is displayed at the top of the window. This indicates that the settings will only be applied to that job.
- User changes settings to accommodate a saddle stitched booklet that is run on an offset press as 16 page signatures and clicks the OK button.
Note: If there is an existing preset already in the dropdown list that fits the imposition requirements, it can be selected from the Imposition Preset dropdown and all of the settings in the preset will populate the fields automatically with the preset settings. - The imposition processes automatically using the new settings applied to the custom imposition for the job.