Before installing, the target PC must be properly prepared. Failure to follow these guidelines may result in installation failures, licensing issues, or unstable system behavior. It may seem like a lot but this is actually the most important part of the installation. Our installer application is mostly just "double-click the installer and hit "Ok" a lot". But for that to work, you need to get this part right.
K2 and Navigator must be installed only on operating systems explicitly supported by Xitron.
Supported Operating System
- Windows 11 Pro
Important Notes
- Home editions of Windows are not supported.
- Server Core and Nano Server installations are not supported.
- Virtual Machines are outside of our production testing. While we routinely run our software in VM's at Xitron, we have not done so in a production environment and therefore cannot advise you at this time. If there is sufficient interest in that option we can make a document telling about how that might be achieved. So far it is unsupported.
Windows Updates
- Install all critical Windows updates before installation.
- Reboot the system after updates are complete.
Operating system configuration
1. Configuration of UAC (UAC: User Account Control):
Log on to Windows by administrator user.
Click on the “Start” button and type “UAC” or “User Account Control.”
Open “Change User Account Control settings”

The following window will be displayed. Change User Account Control Settings to “Never notify” and click the “OK” button.

The following window will be displayed. Click the “Yes” button.

2. Registering “Xitron” username:
Right click on the “Start” button of the Windows and click “Computer Management”.

The following window will be displayed. Click “Local Users and Groups” - “Users”.

From the “Action” menu select “New User”.

The following window will be displayed. Click the “Create” button and click the “Close” button after input and setting as follows.
Username: Xitron
Password: xitron (lowercase)
Confirm password: xitron (lowercase)
User must change password at next logon: uncheck
User cannot change password: uncheck
Password never expires: check
Account is disabled: uncheck

The following window will be displayed. Double-click “Xitron”.

The following window will be displayed. Display the “Member Of” tab and click the “Add” button.

The following window will be displayed. Click the <Advanced> button.

The following window will be displayed. Click the <Find Now> button.
Then select <Administrators> and click the <OK> button.
The following window will be returned. Confirm that “Administrators” is added, and click the “OK” button.

The following window will be returned. Click the <OK> button.

3. Power Options:
Click on “Power Options” in the “Control Panel”

Click on “Change Plan settings”

The following window will appear.
Select "Never" for both "Turn off the display" and "Put the computer to sleep."

Click “Change advanced power settings”.

The following window will be returned. Close this window.

The following window will be returned. Click the “OK” button.

Confirm that “0” is selected in the section of "Hibernate after" and click the “OK” button.

Go to “USB settings” then “USB selective suspend setting” and then set “Setting:” to “Disabled”

The following window will be returned. Click the “Save changes” button.

4. IP Address setting Procedure:
We recommend using a static IP address instead of one assigned by a DHCP server. The reason for this is that we support a diverse range of customers across various environments, and a static IP address remains constant. If the IP address changes, it may prevent clients from connecting, and the software will not function properly.
If you have experience configuring a DHCP server with a long address lease and can register a computer with an assigned address, feel free to proceed with that approach. However, if you encounter any issues, we advise following our recommendations in this section. If you're unsure about anything, we also suggest sticking to our guidance below.
Open the “Control Panel” and select “Network and Sharing Center”.

The following window will be displayed. Click “Change adapter settings”.

The following window will be displayed. Double-click the “Local Area Connection” icon.

The following window will be displayed. Click the “Properties” button.

The following window will be displayed. Select “Internet Protocol Version 4 (TCP/IPv4)” and click the “Properties” button.

The following window will be displayed. Set “IP Address”, “Subnet Mask”, and “Default Gateway”, and click the “OK” button.
For deciding values to input, consult with the customer’s network administrator. Do not leave set to “Obtain an IP address automatically”. You should have a Static IP Address.(Is that strictly true? No. But it definitely prevents big problems. See the explanation at the top of this section)
The following window will be returned, click the “Close” button. Also, click the “Close” button in the next window.


5. Switch procedure to “Private Network:
If your network is labeled as "Unidentified network" or "Public network," you MUST change it to "Private network" in order to enable file sharing and allow other PCs to ping your computer. To do this, click on the “Start” menu, search for “Local Security Policy,” and open it.

The following window will be displayed. Select “Network List Manager Policies” in the left-hand panel, and double click “Unidentified Networks”.
The following window will be displayed. Select “Private” at “Location type” and click the “OK” button. Then close the “Local Security Policy” window.

6. Folder Options:
Go to “Control Panel” and select “Folder Explorer Options”

Select the “View” tab

Check the box next to Always Show Icons, Never Thumbnails”
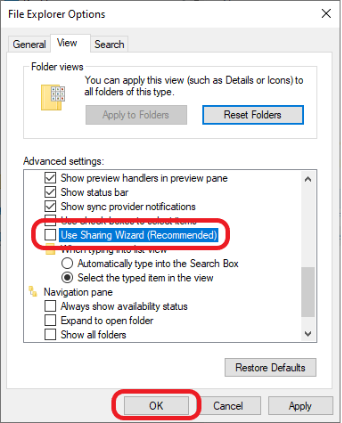

Uncheck the box next to “Use Sharing Wizard (Recommended)” and then click “OK”
7. Anti-Virus:
- Disable all Anti-Virus before installing K2 (see your Anti-Virus Manual for instructions)
- Once installed you can re-enable the Anti-Virus, but you will need to set the following exclusions
- Folder, Services and Ports that must have exclusions set in Anti-Virus programs
- The following folders, service and port must have exclusions set in the anti-virus program that runs on the PC that a K2 system runs on. If there is no anti-virus, then ignore.
K2 and Sentinel Folders to exclude
C:\K2C:\Program Files (x86)\Global GraphicsC:\Program Files (x86)\Common Files\Global Graphics SoftwareC:\Program Files (x86)\Common Files\SafeNet SentinelC:\Program Files (x86)\Common Files\Aladdin Shared\HASPC:\Users\<Username>\AppData\Roaming\Xitron
This is a hidden folder. To access it, enter%appdata%in File Explorer.C:\ProgramData\SafeNet SentinelThis is a hidden folder. To access it, enter%programdata%in File Explorer.- C:\ProgramData\Xitron
Service to exclude
Sentinel LDK License Manager
Ports to exclude
1947— Required for the LDK License Manager9090— Required for the ProofScope Viewer81— Used by the web server inside K2. This value can be changed by the user, so it may not be set to 81. You can verify the current setting under Server Settings in K2 Server.21719— Used for communication between Windows and Macintosh clients and the Server
Impostrip Folders to exclude
- C:\Program Files\Ultimate Technographics\Ultimate Impostrip
- C:\Program Files\Ultimate Technographics\Ultimate Impostrip\bin\win64
- C:\Users\<User>\AppData\Roaming\Ultimate Technographics\Ultimate Impostrip\work
- C:\Users\\<User>\AppData\Roaming\Ultimate Impostrip
Port
27018— MongoDB
Set Exclusions in Windows Anti-Virus
Open Windows settings and open Update & Security

In the left-hand column, open Windows Security.
Under Protected Areas open Virus & treat protection.
This will open a new window
Scroll down to Virus & Treat Protection settings and click on Manage Settings

In the next window scroll down to Exclusions and click on Add or Remove Exclusions
Now click on Add an Exclusion to create an exclusion

Select the type of exclusion (File, Folder, File Type, Process)
Now browse to the location of the File, Folder, File Type, or Process

Repeat the process until all the folders have been excluded.
How to determine what ports are being used on your computer.
Just going to a CMD window and typing "netstat -ano" will give you a list of results. Try it.
In this example, it’s our web server client on localhost, the right-hand column is the Process ID, e.g. we find out here that process 19060 is using port 81 and is our web server.
C:\Users\nick>netstat -ano | find "81"
TCP 0.0.0.0:81 0.0.0.0:0 LISTENING 19060
TCP 127.0.0.1:4767 127.0.0.1:49819 ESTABLISHED 4656
TCP 127.0.0.1:5939 127.0.0.1:58150 ESTABLISHED 5064
TCP 127.0.0.1:49810 127.0.0.1:49811 ESTABLISHED 5376
TCP 127.0.0.1:49811 127.0.0.1:49810 ESTABLISHED 5376
TCP 127.0.0.1:49812 127.0.0.1:49813 ESTABLISHED 5376
TCP 127.0.0.1:49813 127.0.0.1:49812 ESTABLISHED 5376
TCP 127.0.0.1:49814 127.0.0.1:49815 ESTABLISHED 5376
TCP 127.0.0.1:49815 127.0.0.1:49814 ESTABLISHED 5376
TCP 127.0.0.1:49816 127.0.0.1:49817 ESTABLISHED 5376
TCP 127.0.0.1:49817 127.0.0.1:49816 ESTABLISHED 5376
TCP 127.0.0.1:49819 127.0.0.1:4767 ESTABLISHED 13828
TCP 127.0.0.1:58150 127.0.0.1:5939 ESTABLISHED 20644
TCP 192.168.0.34:58149 37.252.232.107:5938 ESTABLISHED 5064
TCP 192.168.0.34:58152 188.172.198.142:5938 ESTABLISHED 5064
TCP 192.168.0.34:58154 188.172.198.147:5938 ESTABLISHED 5064
UDP [fe80::3819:b90e:e076:4e9%3]:1900 *:* 3408
UDP [fe80::3819:b90e:e076:4e9%3]:2177 *:* 10972
UDP [fe80::3819:b90e:e076:4e9%3]:65359 *:* 3408
C:\Users\nick>tasklist | find "19060"
XiWebServer.exe 19060 Console 1 128 K
8. Other general OS configurations:
System Clock and Time Synchronization
- Configure the PC to synchronize with a reliable time source.
- Verify the system clock is accurate before installation.
Power and Sleep Settings
- Configure Windows Power Options to prevent the system from entering any power-saving state.
- Set the system power plan to High Performance.
- Disable all forms of:
- Sleep
- Hibernate
- Hybrid sleep
- Ensure that Windows is not permitted to power down:
- Hard disks
- USB ports
- Network adapters
Reboot
- Perform a clean reboot immediately before starting the installation.